Run an RTL Project on the WIOWIZ EDA Platform
This guide starts with a project that already runs, opens the command that defines the run, executes it in the private Linux terminal, checks the result and then shows how to submit your own RTL and testbench.
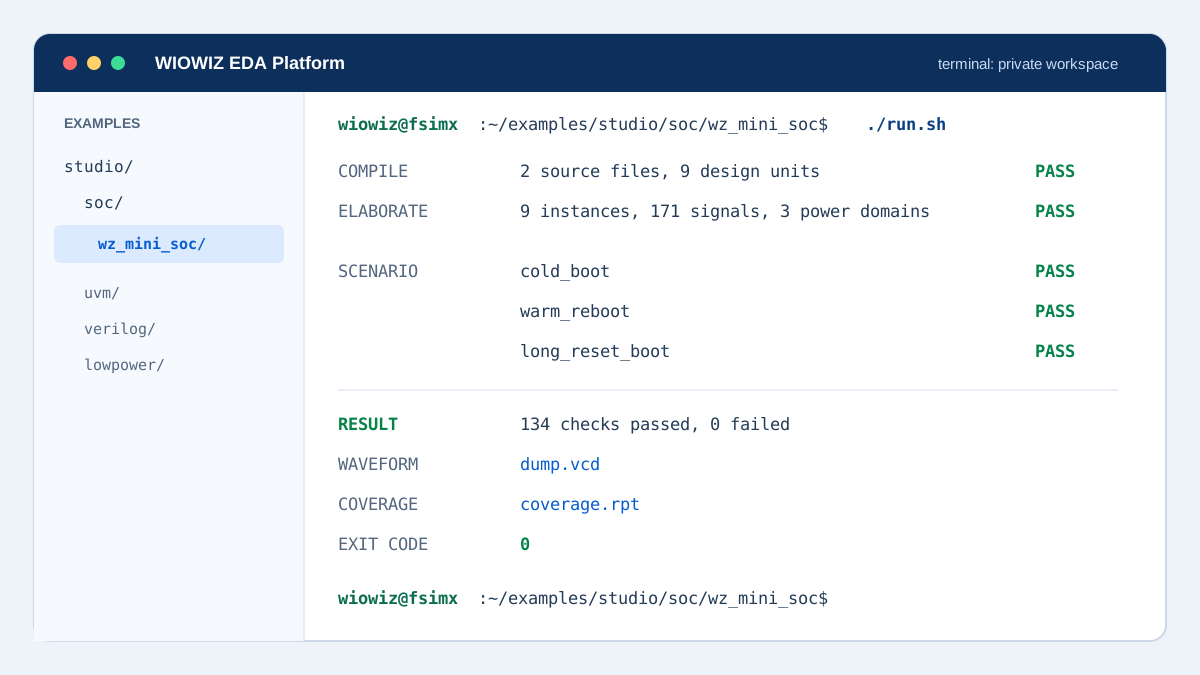
The terminal exposes the project directory, command, engine stages, verdict and generated artifacts in one workspace.
1. Open the platform and choose a working project
Open platform.wiowiz.ai and enter a work email address. After the security check, the platform creates a private browser workspace. Files created in its Linux terminal persist between visits.
For a first run, choose Examples, search for WZ MiniSoC, and select Run. The platform prepares the example and opens its terminal. You can also open Terminal from the home screen and navigate to it directly:
$ cd ~/examples/studio/soc/wz_mini_soc
$ pwd
$ ls -la
The project contains the RTL, testbench, UPF power intent, metadata and run.sh. The script is the run definition. Read it before executing it:
$ sed -n '1,120p' run.sh
fsxrun wz_mini_soc.sv tb_wz_mini_soc.sv \
  -top tb_wz_mini_soc \
  -upf wz_mini_soc.upf \
  -coverage=toggle -coverage-file coverage.rpt \
  -vcd dump.vcd
This command names two source files, selects the testbench top, loads the UPF file, enables toggle coverage and requests a VCD waveform.
2. Ask each tool what it accepts
The terminal puts the WIOWIZ executables on PATH. Use the tool help before changing a project command:
$ fsxrun -help
$ truti -help
$ vwiz-lp -help
$ vwiz-formal -help
-help, -top, -f and -uvm. Several tools reject the two-hyphen form so that an incorrect option does not pass silently.For FSiMX, the most useful starting options are:
-f files.freads a file list.-top tb_topselects the elaboration top.-incdir pathadds an include directory.-define NAME=valuesets a preprocessor definition.-uvm -uvm-home "$UVM_HOME"enables a UVM run.-vcd dump.vcdwrites a waveform.-coverage=toggleselects a coverage family.
3. Run the existing project
Execute the project script and preserve the shell exit code:
$ ./run.sh

[ COMPILE ]
2 file(s), 9 design unit(s), 0 error(s), 0 warning(s)

[ ELABORATION ]
9 instances, 171 signals, 24 processes, 0 errors
UPF: wz_mini_soc.upf loaded (3 domains)

[ SIMULATION ]
SCENARIO[0]: cold_boot
SCENARIO[1]: warm_reboot
SCENARIO[2]: long_reset_boot
TB PASS: WZ MiniSoC 3 scenarios

Result:     PASS
Checks:     134 passed, 0 failed
Coverage:   coverage.rpt

$ echo $?
0
Selected lines from the retained November 16, 2026 run. The complete engine log contains the source list, elaborated hierarchy, UPF domain activity, run time, memory and artifact paths.
Read the run in order. A passing testbench does not replace compile and elaboration checks. Confirm that the expected files were parsed, the expected top was elaborated, the requested power intent was loaded, the named scenarios ran and the shell exit code is zero.
4. Inspect the files produced by the run
The project writes coverage in its current directory. FSiMX stores the waveform and complete log under its timestamped run directory. Locate them with:
$ ls -lh coverage.rpt
$ find runs -type f \( -name dump.vcd -o -name fsxrun.log \) | sort
When an example is launched from the catalogue, the terminal header also exposes View results. Use it to open the waveform and coverage views for the terminal run. Keep the text log beside those views because it records the exact build, options, top and artifact paths.
5. Run your own RTL and testbench
The platform currently provides two accurate paths for user projects.
Path A: upload files from the FSiMX run view
- Open FSiMX from the platform home screen.
- Select Upload and choose the RTL, testbench, headers and optional file list.
- For a multi-file project, include
files.for let the platform generate one from the uploaded HDL files. - Check the detected top module. Set the UVM test name when the project uses UVM.
- Read the generated
fsxruncommand. The command field is editable. - Select Run, then inspect the compile, elaboration and simulation sections before opening waveform or coverage output.
A user-supplied file list keeps source order and include structure explicit. A basic file list can be as small as:
+incdir+rtl/include
rtl/design.sv
tb/testbench.sv
The corresponding command is:
$ fsxrun -f files.f -top tb_top -vcd dump.vcd -coverage=toggle
Path B: create or edit a project inside the terminal workspace
Use this path when you want the shell to own the project directory and command:
$ mkdir -p ~/projects/my_rtl_test
$ cd ~/projects/my_rtl_test
$ vim design.sv
$ vim testbench.sv
$ fsxrun design.sv testbench.sv -top tb_top -vcd dump.vcd
$ echo $?
For repeatable work, put the command in a project run.sh, mark it executable with chmod +x run.sh, and run ./run.sh. Add new options only after checking fsxrun -help.
6. When a run fails
Do not begin with the final PASS or FAIL line. Find the first stage that stopped:
- Input: confirm file names, file-list order, include directories and definitions.
- Compile: fix the first parser or semantic error before reading later messages.
- Elaboration: confirm the top module, parameter values and unresolved instances.
- Simulation: identify the first assertion, scoreboard or fatal message.
- Artifacts: verify that the expected waveform, coverage report and log were written.
- Exit code: use
echo $?. Zero means the command completed successfully. A nonzero value must not be reported as a passing run.
Start with the bundled MiniSoC project, inspect its command, and then replace its sources with your own project.
Open the WIOWIZ EDA Platform